Is it possible to “squeeze out” a high performance from a WordPress site? Our answer is yes! In this article, we show how to set up a WordPress site configured to sustain high loads up to 10,000 clients per second, which equates to 800 million visits a day.
First, we need our own virtual private server (VPS). For testing we used a VPS leased from DigitalOcean (monthly rate USD 20) with the following parameters: 2GB of memory, 2 processors, 40GB on SSD. CentOS Linux release 7.3 has been chosen as the operating system.
The text below is almost a step-by-step instruction for experienced administrators. We will provide here only those parameters, which differs from default ones, and increase server performance. So, go ahead!
Install nginx
First, we create a yum repository file for Nginx:
touch /etc/yum.repos.d/nginx.repo
Insert the following text into this file:
[nginx]
name=nginx repo
baseurl=http://nginx.org/packages/OS/OSRELEASE/$basearch/
gpgcheck=0
enabled=1
You have to replace “OS” to “rhel” or “centos” depending on distributive used, and “OSRELEASE” to “5”, “6” or “7” for versions 5.x, 6.x, or 7.x, respectfully.
Start the installation:
yum -y install nginx
Edit nginx.conf
# Automatically setup number of processes, equal to number of processors
worker_processes auto;

# In events section
# epoll is an effective method of processing connections
    use epoll;

# Worker to accept all new connections at once (otherwise one by one)
    multi_accept on;

# In http section
# Switch off all logs
    error_log /var/log/nginx/error.log crit;    # only critial error messages
    access_log off;
    log_not_found off;

# Switch off ability to show port number on redirect
    port_in_redirect off;

# Allow more requests for keep-alive connection
    keepalive_requests 100;

# Lower buffers to a resonable level
# This allows to save memory at big number of requests
    client_body_buffer_size 10K;
    client_header_buffer_size 2k;    # for WordPress, 2k may not be enough
    client_max_body_size 50m;
    large_client_header_buffers 2 4k;

# Lower timeouts
    client_body_timeout 10;
    client_header_timeout 10;
    send_timeout 2;

# Enable reset connections on timeout
    reset_timedout_connection on;

# Speed up tcp
    tcp_nodelay on;
    tcp_nopush on;

# Allow usage of system Linux function senfile() to speed up file transfers
    sendfile on;

# Turn on zipping of data
    gzip on;
    gzip_http_version 1.0;
    gzip_proxied any;
    gzip_min_length 1100;
    gzip_types text/plain text/css application/json application/x-javascript text/xml application/xml application/xml+rss text/javascript application/javascript image/svg+xml;
    gzip_disable msie6;
    gzip_vary on;

# Turn on caching of open files
    open_file_cache max=10000 inactive=20s;
    open_file_cache_valid 30s;
    open_file_cache_min_uses 2;
    open_file_cache_errors on;

# Set php timeout
    fastcgi_read_timeout 300;

# Connect php-fpm via socket - works faster than by tcp
    upstream php-fpm {
        # This must corespond to "listen" directive in php-fpm pool
	server unix:/run/php-fpm/www.sock;
    }

# Connect additional configuration files
    include /etc/nginx/conf.d/*.conf;
Create file /etc/nginx/conf.d/servers.conf and write here server sections for sites. An example:
# Rewrite from http
server {
    listen 80;
    server_name domain.com www.domain.com;
    rewrite ^(.*) https://$host$1 permanent;
}

# Process https
server {
# Switch on http2 - speeds up processing (binary, multiplexing, etc.)
    listen 443 ssl http2;
    ssl_certificate /etc/nginx/ssl/domain.pem;
    ssl_certificate_key /etc/nginx/ssl/domain.key;

    server_name domain.com www.domain.com;

    root /var/www/domain;
    index index.php;

# Process php files
    location ~ \.php$ {
        fastcgi_buffers 8 256k;
        fastcgi_buffer_size 128k;
        fastcgi_intercept_errors on;
        include fastcgi_params;

        try_files $uri = 404;
    	fastcgi_split_path_info ^(.+\.php)(/.+)$;

        fastcgi_param SCRIPT_FILENAME $document_root$fastcgi_script_name;
        fastcgi_pass unix:/var/run/php-fpm.sock;
        fastcgi_index index.php;
    }

# Cache all statics
    location ~* ^.+\.(ogg|ogv|svg|svgz|eot|otf|woff|mp4|ttf|rss|atom|jpg|jpeg|gif|png|ico|zip|tgz|gz|rar|bz2|doc|xls|exe|ppt|tar|mid|midi|wav|bmp|rtf)$ {
        expires max;
	add_header Cache-Control "public";
    }

# Cache js and css
    location ~* ^.+\.(css|js)$ {
	expires     1y;
	add_header Cache-Control "max-age=31600000, public";
    }
}
Start nginx:
systemctl start nginx
systemctl enable nginx
Install MySQL
yum install -y https://dev.mysql.com/get/Downloads/MySQL-5.7/mysql-community-server-5.7.18-1.el7.x86_64.rpm
yum -y install mysql-community-server
Edit /etc/my.cnf
Below is the group of parameters for a server with 2GB of memory. For a 1GB memory server, you should cut buffer sizes in half, but it is not worth touching those parameters, which have 64M and lower values. All parameters here are important, but the most important is “query_cache_type = ON”. By default, caching of requests in MySQL is switched off! The reason is unknown, maybe memory saving. But, with turning this parameter on, database access becomes much faster, which has an immediate impact on the admin pages of a WordPress site.
max_connections = 64
key_buffer_size = 32M

# innodb_buffer_pool_chunk_size default value is 128M
innodb_buffer_pool_chunk_size=128M

# When innodb_buffer_pool_size is less than 1024M,
# innodb_buffer_pool_instances will be ajusted to 1 by MySQL
innodb_buffer_pool_instances = 1

# innodb_buffer_pool_size must be equal to or a mulitple of
# innodb_buffer_pool_chunk_size * innodb_buffer_pool_instances
innodb_buffer_pool_size = 512M

innodb_flush_method = O_DIRECT
innodb_log_file_size = 512M
innodb_flush_log_at_trx_commit = 2
thread_cache_size = 16

query_cache_type = ON
query_cache_size = 128M
query_cache_limit = 256K
query_cache_min_res_unit = 2k

max_heap_table_size = 64M
tmp_table_size = 64M
Start:
systemctl start mysqld
systemctl enable mysqld
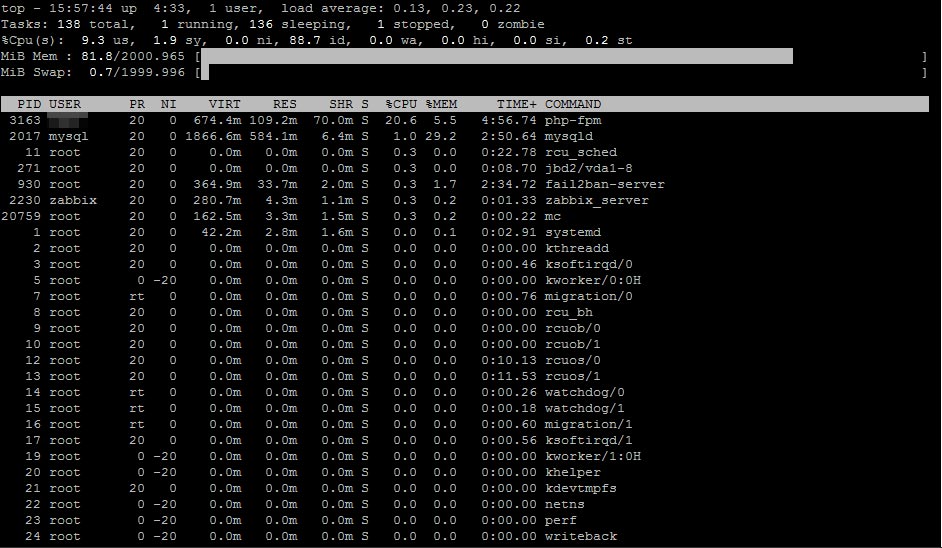
The main principle to create a high-performance WordPress site is the following: everything should reside in 75% of physical memory: Nginx, MySQL, php-fpm. In console “top” command we should see that 20-25% of physical memory is free and swap is not used. This spare memory will be very helpful for launching multiple php-fpm processes at the processing dynamic site pages.
Install php
Surely, we are interested in version 7 only, which is almost 2 times faster than the previous one – php5. The excellent build is in the webtatic repository. Additionally, we need an Epel repository.
Install:
rpm -Uvh https://dl.fedoraproject.org/pub/epel/epel-release-latest-7.noarch.rpm
rpm -Uvh https://mirror.webtatic.com/yum/el7/webtatic-release.rpm
yum -y install php72w
yum -y install php72w-fpm
yum -y install php72w-gd
yum -y install php72w-mbstring
yum -y install php72w-mysqlnd
yum -y install php72w-opcache
yum -y install php72w-pear.noarch
yum -y install php72w-pecl-imagick
yum -y install php72w-pecl-apcu
yum -y install php72w-pecl-redis
Please pay attention to the php72w-pecl-apcu package, which connects data caching (APCu), in addition to object caching (OpCache), and to php72w-pecl-redis, which connects object cache server Redis. WordPress supports ACPu. Redis support is available with the plugin Redis Object Cache.
Edit /etc/php.ini
; This value should be increased on systems where PHP opens many files
realpath_cache_size = 64M

; Do not increase standard memory limit for process without certain need
; Most of WordPress sites consume some 80 MB
memory_limit = 128M

; And this is good to shrink to save memory allocated for buffers
; Post size is rarely bigger than 64 MB
post_max_size = 64M

; Usually size of downloads is not bigger than 50 MB
upload_max_filesize = 50M

; The following rule has to be used:
; upload_max_filesize < post_max_size < memory_limit

; And do not forget about OpCache tuning
; Kill the processes holding locks on the cache immediately
opcache.force_restart_timeout = 0

; Save memory storing equal strings only once for all php-fpm processes
; On 2GB server, it was impossible to set more than 8
opcache.interned_strings_buffer = 8

; Define how many PHP files, can be held in memory at once
; On 2GB server, it was impossible to set more than 4000
opcache.max_accelerated_files = 4000

; Define how much memory opcache is consuming
; On 2GB server, it was impossible to set more than 128
opcache.memory_consumption = 128

; Bitmask where bit raised means certain optimization pass is on
; Full optimization
opcache.optimization_level = 0xFFFFFFFF
Edit /etc/php-fpm.d/www.conf
; Reduce number of child processes
;pm.max_children = 50
pm.max_children = 20

;pm.start_servers = 5
pm.start_servers = 8

;pm.max_spare_servers = 35
pm.max_spare_servers = 10

; Kill processes after 10 seconds of inactivity
pm.process_idle_timeout = 10s;

; Number of requests of child process, after which in will be restarted
; It is useful to prevent memory leaks
pm.max_requests = 500
Start:
systemctl restart php-fpm
systemctl enable php-fpm
Install Redis
It is simple, no configuration.
yum -y install redis
systemctl start redis
systemctl enable redis
Install WordPress
Well, we omit this section as evident.
On the WordPress site, we definitely have to install the WP Super Cache plugin. Standard settings are OK. What does this plugin do? At the first access to a page or post in WordPress, the plugin creates .html file with the same name and saves it. On later attempts to access, it intercepts WordPress execution and instead of repeating page generations, delivers saved .html from its own cache. Evidently, this mechanism radically improves site performance.
Test
Go ahead?
Actually, yes – we can start testing. As a test rabbit was used the site you are reading now, and its copy at test2.kagg.eu – all the same, but without HTTPS.
As an instrument of stress testing was selected loader.io. On the free account, this web service offers the capability to test one site with up to 10,000 clients per second. But we do not need more, as we can see later.
First results impressed – without HTTPS site survived 1,000 clients per second. Page size, including pictures, is 1.6 MB.
Microcaching
1,000 hits per second are not bad, but we need something more! What to do? Nginx has such a useful feature as micro caching. This means caching files and other resources for a short time – from seconds to minutes. When fast requests are coming, the next user gets data from the micro cache, which significantly decreases response time.
Edit /etc/nginx/nginx.conf – insert one line before ending “include” in the code above:
fastcgi_cache_path /var/cache/nginx/fcgi levels=1:2 keys_zone=microcache:10m max_size=1024m inactive=1h;
Edit /etc/nginx/conf.d/servers.conf – in “location ~ \.php$ {” section insert:
        fastcgi_cache microcache;
        fastcgi_cache_key $scheme$host$request_uri$request_method;
        fastcgi_cache_valid 200 301 302 30s;
        fastcgi_cache_use_stale updating error timeout invalid_header http_500;
        fastcgi_pass_header Set-Cookie;
        fastcgi_pass_header Cookie;
        fastcgi_ignore_headers Cache-Control Expires Set-Cookie;
Well, evidently, restart Nginx.
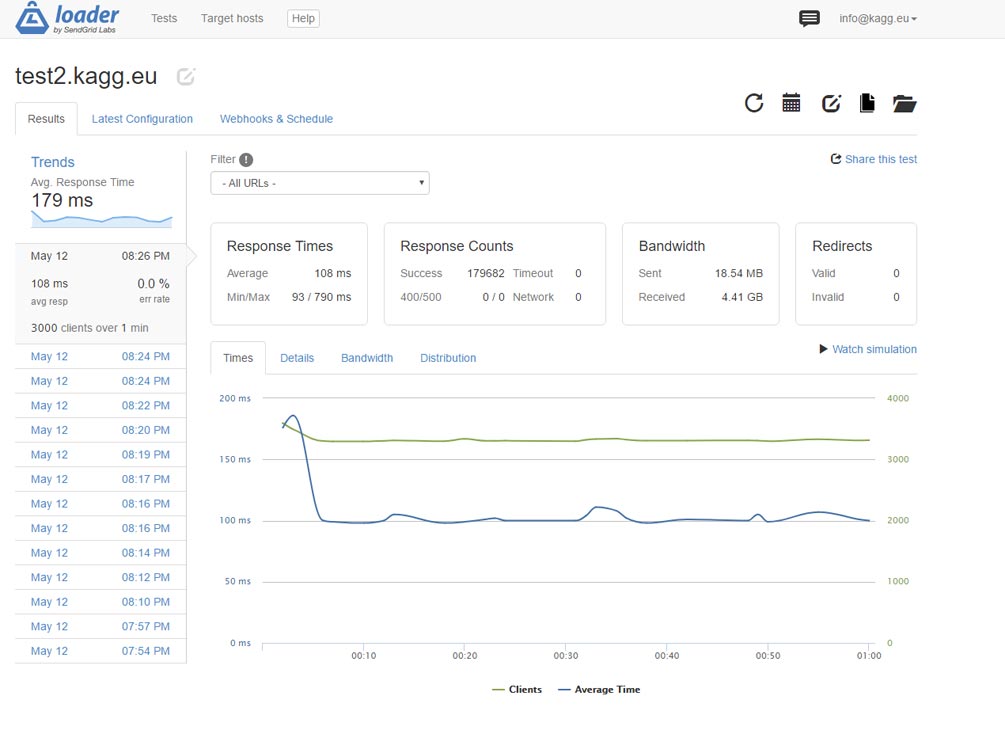
The result is stunning: we increase performance by 3 times. The site delivers the home page with a weight of 1.6 MB over HTTP 3,000 times per second! Average response time – 108 ms.
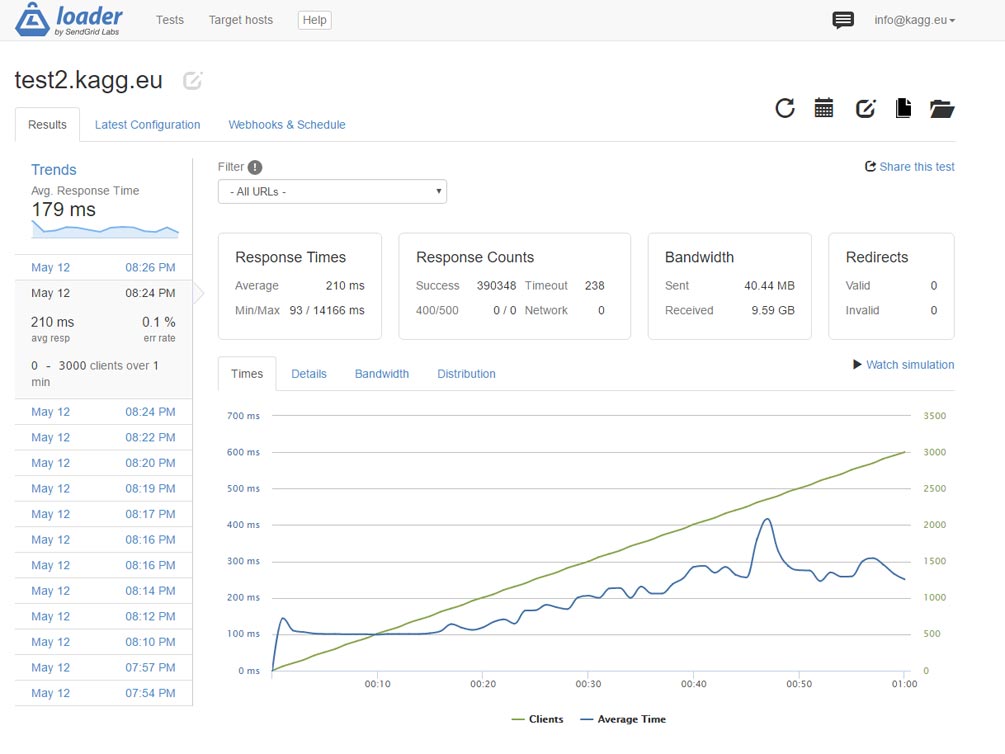
Checking in another model: linear grow of requests from 0 to 3,000 per second. Works. Average response time – 210 ms.
Dataflow at a constant number of 3,000 clients per second reaches 1 Gbit per second, even with compressing. What we can see on the Zabbix monitor screen.
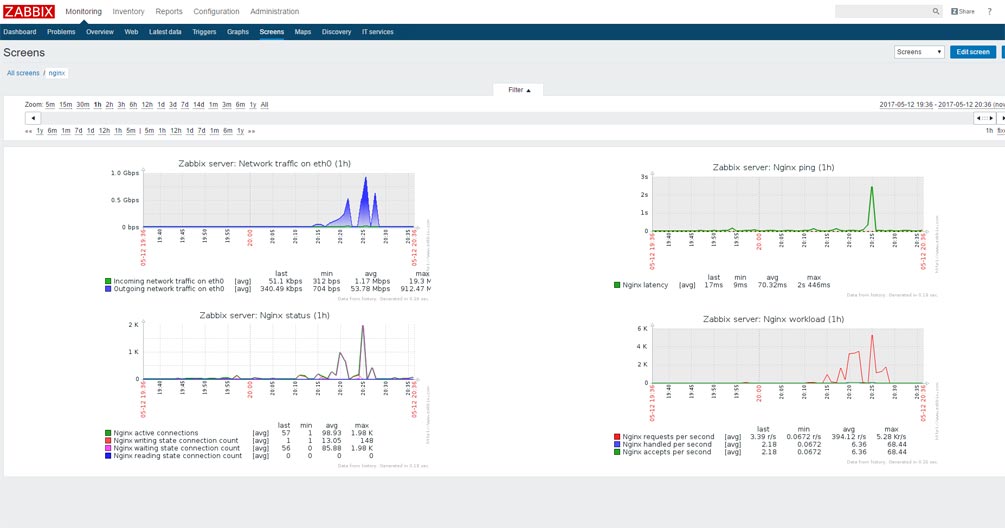
Zabbix, by the way, runs on the same test server.
And what with https?
And with HTTPS it is significantly slower as expected. Too many operations for key negotiations, hashing, ciphering etc. It is quite funny to see in the top console command as two Nginx workers devour by 99% of CPU each :). This is the result – 1,000 connections per second:
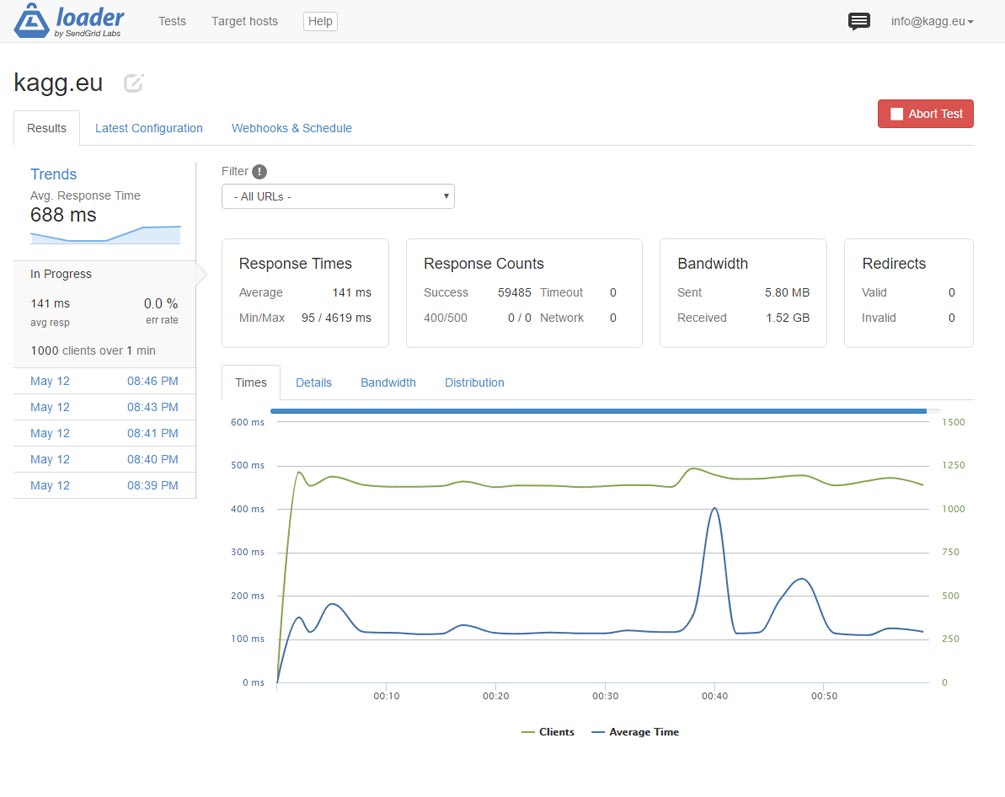
Results are not bad, but we can do more!
Rewrite in nginx
Let us think – what is going on when the site page is accessed?
- nginx accepts request and sees that index.php is needed
- nginx starts php-fpm (what is not fast at all)
- WordPress starts to work
- At the beginning, WP Super Cache plugin encounters and slips already saved .html instead of infinitely long (in these timing terms) page generation
None of that is bad, but: we need to start php-fpm, and then execute some PHP code, to respond with saved .html.
There is a solution to how to proceed without PHP at all. Let us do a rewrite on Nginx at once.
Edit again /etc/nginx/conf.d/servers.conf – and after “index index.php;” line insert:
include snippets/wp-supercache.conf;
Create folder /etc/nginx/snippets and file wp-supercache.conf in it with the following content:
# WP Super Cache rules.

set $cache true;

# POST requests and urls with a query string should always go to PHP
if ($request_method = POST) {
    set $cache false;
}

if ($query_string != "") {
    set $cache false;
}

# Don't cache uris containing the following segments
if ($request_uri ~* "(/wp-admin/|/xmlrpc.php|/wp-(app|cron|login|register|mail).php
                      |wp-.*.php|/feed/|index.php|wp-comments-popup.php
                      |wp-links-opml.php|wp-locations.php|sitemap(_index)?.xml
                      |[a-z0-9_-]+-sitemap([0-9]+)?.xml)") {
    set $cache false;
}

# Don't use the cache for logged-in users or recent commenters
if ($http_cookie ~* "comment_author|wordpress_[a-f0-9]+
                     |wp-postpass|wordpress_logged_in") {
    set $cache false;
}

# Set the cache file
set $cachefile "/wp-content/cache/supercache/$http_host${request_uri}index.html";
set $gzipcachefile "/wp-content/cache/supercache/$http_host${request_uri}index.html.gz";

if ($https ~* "on") {
	set $cachefile "/wp-content/cache/supercache/$http_host${request_uri}index-https.html";
	set $gzipcachefile "/wp-content/cache/supercache/$http_host${request_uri}index-https.html.gz";
}

set $exists 'not exists';
if (-f $document_root$cachefile) {
	set $exists 'exists';
}

set $gzipexists 'not exists';
if (-f $document_root$gzipcachefile) {
	set $gzipexists 'exists';
}

if ($cache = false) {
	set $cachefile "";
	set $gzipcachefile "";
}

# Add cache file debug info as header
#add_header X-HTTP-Host $http_host;
add_header X-Cache-File $cachefile;
add_header X-Cache-File-Exists $exists;
add_header X-GZip-Cache-File $gzipcachefile;
add_header X-GZip-Cache-File-Exists $gzipexists;

#add_header X-Allow $allow;
#add_header X-HTTP-X-Forwarded-For $http_x_forwarded_for;
#add_header X-Real-IP $real_ip;

# Try in the following order: (1) gzipped cachefile, (2) cachefile, (3) normal url, (4) php
location / {
    try_files @gzipcachefile @cachefile $uri $uri/ /index.php?$args;
}

# Set expiration for gzipcachefile
location @gzipcachefile {
	expires 43200;
	add_header Cache-Control "max-age=43200, public";

	try_files $gzipcachefile =404;
}

# Set expiration for cachefile
location @cachefile {
	expires 43200;
	add_header Cache-Control "max-age=43200, public";

	try_files $cachefile =404;
}
Executing these instructions, Nginx looks by itself, if there is .html available (or compressed .html.gz) in WP Super Cache plugin folders, and if .html exists, takes it without starting any php-fpm at all.
Restart Nginx, start the test and look at the console top command. And – what a miracle – no php-fpm processes are starting, when previously we saw a pair of tens. Only Nginx works by two of its own workers.
What do we have in the result? Instead of 3,000 times per second, the server is able to return the home page without HTTPS 7,500 times per second! Remember, the page weighs 1.6 MB. Dataflow is 2 Gigabit per second, and, it seems, we are limited by the DigitalOcean server bandwidth.
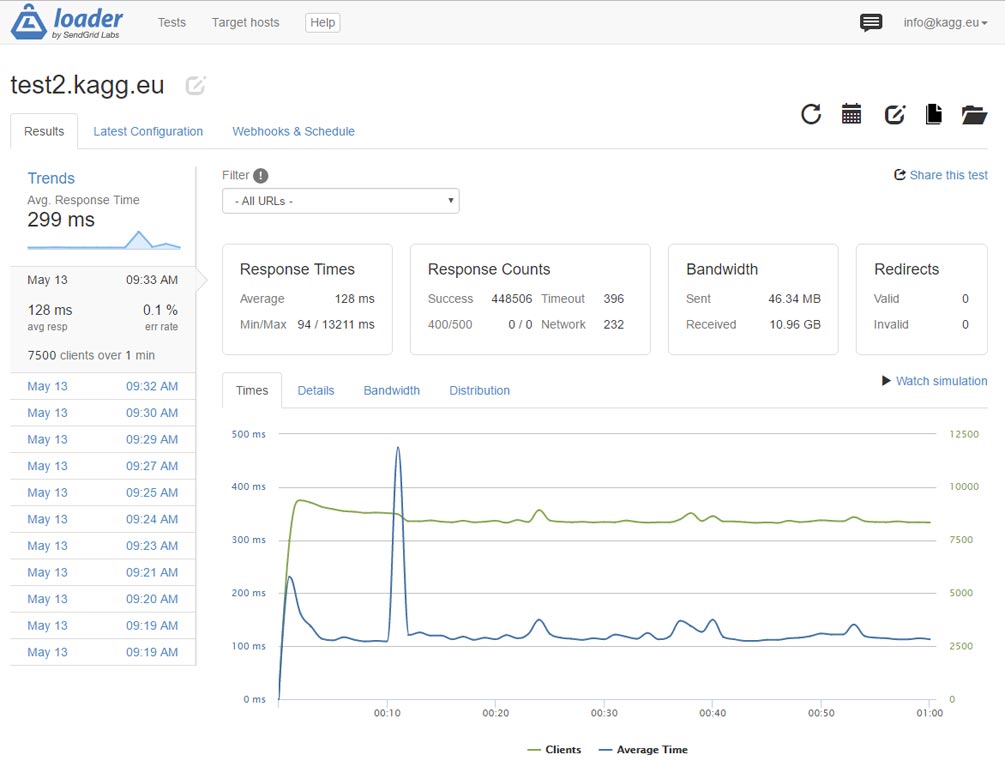
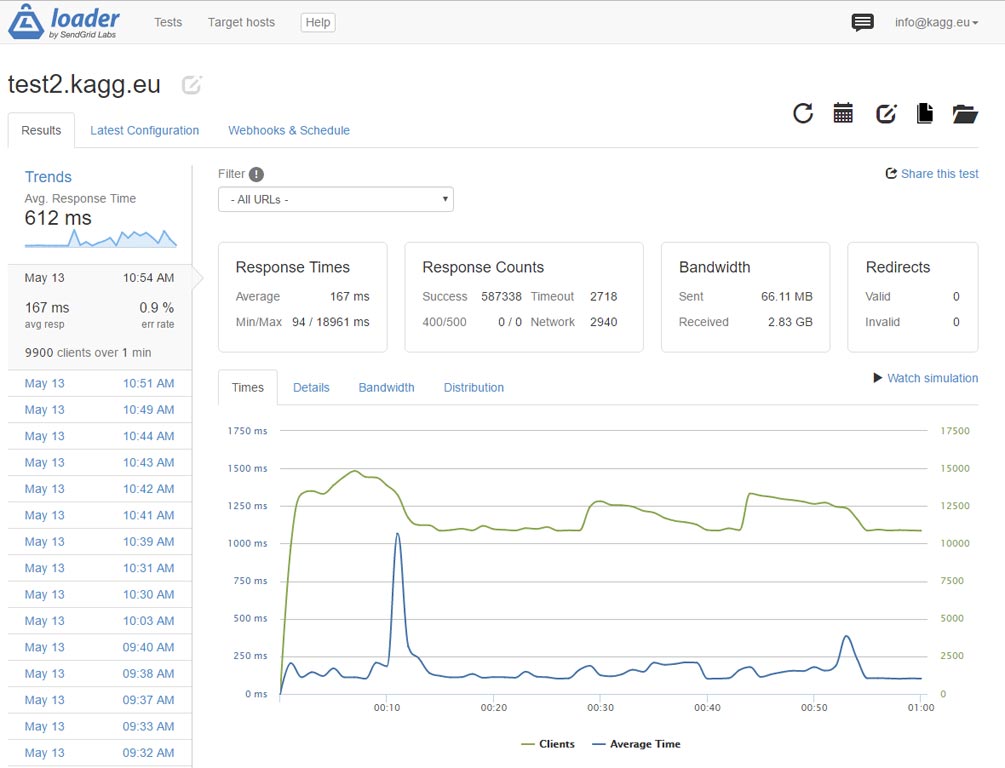
And, what if to test the response of a small page, let say /contacts on the same site?
Here we probably reached the server limit. However, got the result from the title of this article: 10,000 clients per second! Remember – 10,000-page visits per second on a real WordPress site – with installed plugins, nice (but not a lightweight theme) etc.
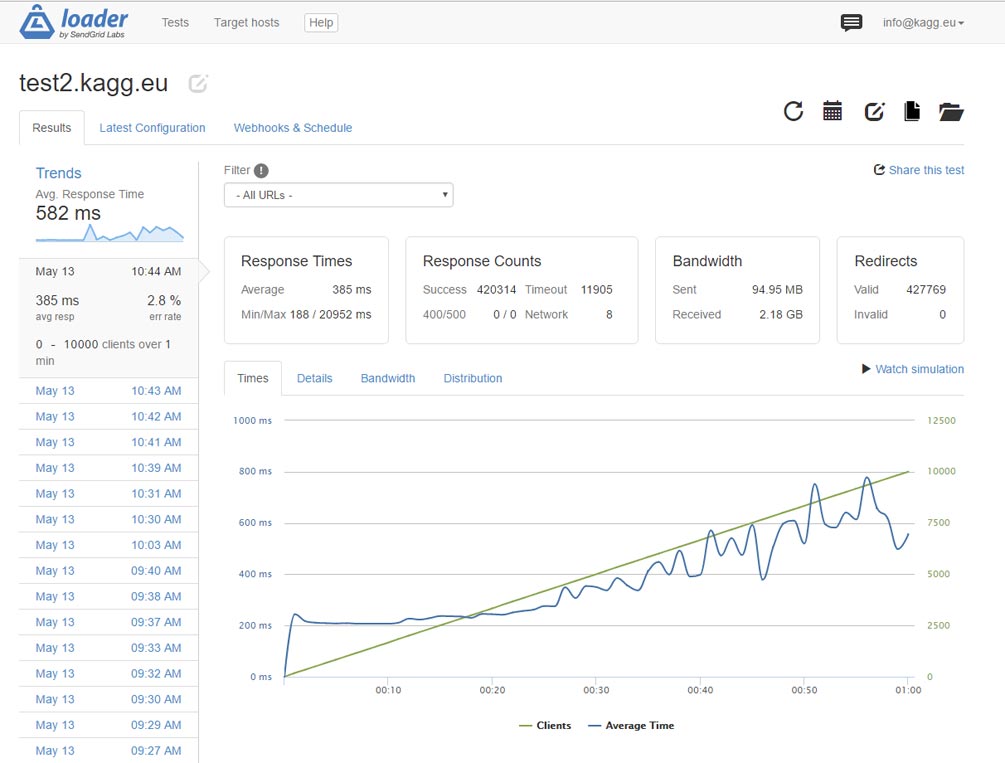
Scenario with load increase works also.
Test with HTTPS in this configuration showed not a significant increase of performance – up to 1,100 clients per second. All CPU time it seems is paid to ciphering…
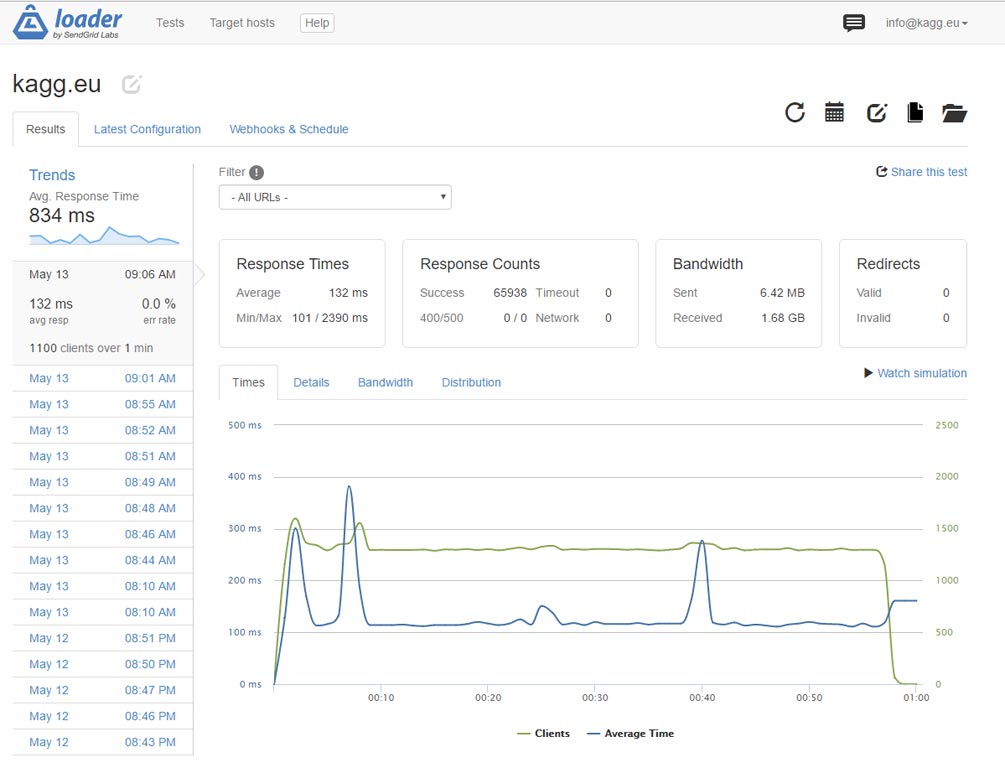
Summary
We have shown here that a standard WordPress site with proper server configuration and caching is able to return not less than 10,000 pages per second over HTTP. During 24 hours, such a site withstands incredible 800 million visits.
Over HTTPS, the same site can return not less than 1,100 pages per second.
Means and methods used to achieve the result:
- Virtual server (VPS) on DigitalOcean: 2 GB of memory, 2 processors, 40 GB SSD, 20 USD per month
- CentOS 7.3 64-bit
- Latest versions of nginx, php7, mysql
- WP Super Cache plugin
- Microcaching in nginx
- Full excerption of php startup even to show cached pages –
by means of rewrite in nginx
And, no Varnish at all! 🙂


Спасибо за информацию!!!!!
Nice tutorial! I am trying to serve gzip version of pages created by Wp-super-cache but nginx is not reading correctly the path. Using strace command I can see that nginx is reading the html version o pages. I also enable gzip_static on; but the same result.
# strace -p 30477 2>&1 | grep domain.com
openat(AT_FDCWD, “/var/www/domain.com/web/wp-content/cache/supercache/www.domain.com/index-https.html”, O_RDONLY|O_NONBLOCK) = 70
openat(AT_FDCWD, “/var/www/domain.com/web@gzipcachefile”, O_RDONLY|O_NONBLOCK) = -1 ENOENT (No such file or directory)
openat(AT_FDCWD, “/var/www/domain.com/web@cachefile”, O_RDONLY|O_NONBLOCK) = -1 ENOENT (No such file or directory)
openat(AT_FDCWD, “/var/www/domain.com/web/”, O_RDONLY|O_NONBLOCK) = 73
openat(AT_FDCWD, “/var/www/domain.com/web/index.html”, O_RDONLY|O_NONBLOCK) = -1 ENOENT (No such file or directory)
stat(“/var/www/domain.com/web”, {st_mode=S_IFDIR|0751, st_size=4096, …}) = 0
openat(AT_FDCWD, “/var/www/domain.com/web/index.htm”, O_RDONLY|O_NONBLOCK) = -1 ENOENT (No such file or directory)
openat(AT_FDCWD, “/var/www/domain.com/web/index.php”, O_RDONLY|O_NONBLOCK) = 73
Can you please check again the nginx rules? Thank you!
Thank you.
Everything is OK. gzip should be turned on in nginx (you can see “gzip on;” in my article). With it, WP Super Cache option “Compress pages so they’re served more quickly to visitors. (Recommended)” must be turned off. Compression by web server is much faster and preferable.
You can check gzip status in browser as described here: https://conetix.com.au/support/how-to-check-gzip-is-enabled/
Or, you can use test service: https://www.giftofspeed.com/gzip-test/
If you check my site, you will see in the browser “x-content-encoding-over-network: br” in “Response Headers”. This means “Brotli Is Enabled”, and the same says online test service. Brotli is a new compression algorithm provided by Cloudflare (and my site is behind Cloudflare).
Thank you for reply.
I’ve tested your configuration on my website and nginx is serving directly the index-https.html file not the index-https.html.gz, previously created by wp super cache.
Also as you can see on my previous comment I used strace command to trace what nginx is doing when I am accessing the website and is throwing “No such file or directory” for @gzipcachefile @cachefile directives.
openat(AT_FDCWD, “/var/www/domain.com/web@gzipcachefile”, O_RDONLY|O_NONBLOCK) = -1 ENOENT (No such file or directory)
openat(AT_FDCWD, “/var/www/domain.com/web@cachefile”, O_RDONLY|O_NONBLOCK) = -1 ENOENT (No such file or directory)
openat(AT_FDCWD, “/var/www/domain.com/web/”, O_RDONLY|O_NONBLOCK) = 73
openat(AT_FDCWD, “/var/www/domain.com/web/index.html”, O_RDONLY|O_NONBLOCK) = -1 ENOENT (No such file or directory)
What I want to achieve is to serve index-https.html.gz file previously created by WP Super Cache plugin and avoid some CPU cycles in order to compress the *.html files. This way nginx will be able to serve much more connections over https without devouring 99% cpu. Unfortunately something is wrong with your nginx directives and the code is not working as it should.
x-content-encoding-over-network: br is showed in the browser because your website is behind Cloduflare network. If you disable Cloudflare you’ll see the actual results of your server.
From my tests what I can say 100% for sure is that nginx is not serving *.gz files previously generated by wp super cache plugin because of nginx’s directives from your code.
I feel some misreading of my previous message.
.gzfiles are created by Super Cache, when option is set. You don’t need.gzfiles, and it is a bad practice. You’d better setgzip on;in nginx. Turning on gzip both in nginx and in the plugin is a wrong idea. Small degradation in the performance only.Please look at my client site https://houselit.ru/. It is not behind the Cloudflare, and has the same settings as in the article. You can see that cache file exists and
X-Content-Encoding-Over-Networkisgzip.If you want (I do not understand the reason) to have
gzipfiles to be served, you can turn on option in Super Cache, and apply small fix in mywp-supercache.conffile.Instead of
set $gzipcachefile “/wp-content/cache/supercache/$http_host${request_uri}index.html.gz”;
write
set $gzipcachefile “/wp-content/cache/supercache/$http_host${request_uri}index-https.html.gz”;
This is my small bug in https mode. You can find edited
wp-supercache.confin the article.Below is the result for https://houselit.ru/
Thanks for reply!
If you test the configuration with gzip off; in nginx and serve *.gz files already created by wp super cache or some other wordpress plugin you’ll see a a huge performance when serving traffic through https. CPU is not used to gzip files on the fly by nginx but instead they are served directly by nginx.
At the time when I first posted my opinion I already had the modifications on wp-supercache.conf suggested by you.
The problem now with this configuration is that nginx doesn’t gzip other mime types like *.js *.css *.xml etc.
To conclude, a better configuration for wordpress using plugins like wp-super-cache would be as follows:
Turning gzip off; in nginx globally and turning gzip on; for different locations. In this case turning gzip off for “/wp-content/cache/supercache/” location and letting nginx serve gzip version of html files will save a lot of CPU cycles and increase performance through https especially on low budget when choosing VPS hosting.
The only thing left is to create a location with gzip on; and let nginx gzip *.css *.xml *.js on the fly or set gzip_static on; and serve them already gzipped. It’s a matter of preference and will not count that much as long as the server will be behind a CDN like Cloudflare.
By serving gzip version of html files through https, my server (same specs as yours) was able to serve about 3000 concurrent connections, the CPU standing at 30%.
Thank you for your considerations. They are reasonable. Will try to test with loader.io.
Can u Set this up for me and if so how much would it cost me
Hello, I have answered in a private email.
Thanks for the tutorial .
Any chance for making same tutorial for Ubuntu users.
Thank you for your comment. I am not sure that separate tutorial for Ubuntu is really needed. There a lot of tutorials in the Internet on how to install php/mysql/nginx on Ubuntu, you can use them.
The main idea of the current article is to show proper configuration files, and they are the same in Cent OS and Ubuntu.
Hi there
Very nice tutorial.
My issue is my site, a must logged site, is serving contents from one user to another user. I’ve identified that this is happening due to fastcgi_cache_key, where is using the address and method etc…. on microcaching.
Is there a way to avoid it ?
If I turn microcaching off it works as usual.
Thanks
Thank you. You can comment out the line
#fastcgi_cache microcache;
Thanks for your tutorial. Do you know of a way to simulate (test) users logging into a WordPress site?
Thank you. You can add wordpress_logged_in_xxxxxxx cookie to loader.io request: https://support.loader.io/article/37-do-you-support-cookies
Thanks for the tutorial.I have one question:Is this possible to use also Varnish with this setup?Or Varnish is not needed as Nginx Microcaching is used?
Thank you. Varnish is not needed here.
Hi, I would like to ask about the configuration on Loader.io. It should get, post, patch, or another else on Client Request setting?
Hi Robi,
Just GET request on Loader.io.
Helllo there!
First of all really thank you for this awesome guide.
Anyway I’ve got an issue on all of the servers i tested it (mainly Ubuntu 18.04) with the login in the admin area (wp-admin).
Something strange happens (also with no plugins/themes installed at all): when i go to the admin dashboard as a not-logged-in user, WP redirects me on the login.php page (that is ok, also adding the redirect url with reauth=1).
When i type correct username and password and click on the login button, it redirect me to wp-admin (302) and again to wp-login.php (302).
I then need to do the auth several times before i can correctly login. The issue is infinite if i try to login very quick by fast-clicking the login button.
If i wait some time (around 3 to 5 seconds), after 3-4 times repeating the login, then WP correctly log me in.
Everything seems to be ok in wp-config.php and also in nginx confs.
I think that this could be related to some time setting in caching configuration (i used your values) but i just cannot figure it out. It happens on all browsers (macOS/Windows on Firefox, Edge, Chrome, Safari).
Do you think we can try something?
Thank you,
Marco.
EDIT: little bit of confusion. OS = Centos7.
Hi Marco, thank you.
It looks like that caching is in effect on admin pages. Please try to turn off micro caching (remove the line ‘fastcgi_cache microcache’).
Thank you for the reply.
I just excluded the snippet from nginx.conf and also microcache and the issue went away. I ended up by using W3 total cache and its .conf file that it generates. For now I’m not using microcaching but I will try to find a solution.
Thank you!
I am not sure what do you mean under generated .conf file. It could be that you are missing the main point of this article – the cache should be read directly by the browser, without starting any PHP code. You should have an
nginxconf file similar to thewp-supercache.confdiscussed in the article.Hello Kagg,
It seems that we need to add an exception in Nginx in order to bypass the cache for POST requests and wp-admin.
After some researches, I am apparently able to avoid this issue.
Just added this in location \.php block:
if ($request_method = POST)
{
set $no_cache 1;
}
if ($request_uri ~* “/(wp-admin)”)
{
set $no_cache 1;
}
fastcgi_cache_bypass $no_cache;
fastcgi_no_cache $no_cache;
In order to see if cache is actually working or not, I also added an header:
add_header X-Proxy-Cache $upstream_cache_status;